|
|
 |
||
|
The Iron Duke Resource Site |
|||
| |||||||||||
|
Welcome to my newly
redesigned Fiero 2M4 resource site. The original site recorded over
12000 visits, hopefully this one will also prove as useful.
|
SEEK ADVICE FROM ONE WHO KNOWS HOW TO CURE A FAILING FIERO
POWER
SECRETS FOR THE 4 CYLINDER FIERO
by
S. J. Wynman
Most
Fiero owners have 4 cylinder engines to power their cars. It appears no one
has ever cared to have any real performance enhancement for these Fieros -
well, your time has come! Now you can read about some methods to improve the
overall engine performance of the stock Fiero 4 cylinder motor. This article
is divided up into several topics:
(1)
Throttle body
enhancements
(2)
Port Matching
(3)
Octane Tuning
(4)
Decarbonizing
(5)
Valve Guide Sealing
(6)
Increasing the Redline
(7)
Harmonic Balancer usage
(8)
Performance Build Up
Parts List
Not
all of the recommendations will apply to every year 4 cylinder Fiero. The
first thing you must realize are the differences between the various 4
cylinder motors GM installed in the Fiero. The Table below summarizes the
differences as they pertain to the article:
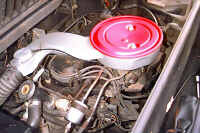
THROTTLE
BODY ENHANCEMENTS
Back
in the mid-1980's HOLLEY felt they had a quick answer to the lack luster
performance offered in all GM 2.5 Liter motors. They actually hit on something
good, but it appears the idea was not an original one. GM used a performance
Throttle Body Injection (TBI) unit on one of the original 1984 INDY Pace cars.
GM later provided HOLLEY one of the prototype units and HOLLEY mass-produced
them. Not only was the throttle body bore increased from 1.68" to
2.00", but the single injector output was increased to make use of the
increased air flow. Although the result was impressive, HOLLEY wanted even
more. They developed their own intake manifold, which had a larger intake
runners, and TBI mounting bore to accommodate the larger throttle body bore.
As a result, the combination proved to be excellent.
This
TBI can even bolt onto the stock 1984 through 1986 intake manifold. HOLLEY
provides an adaptor gasket to allow the new TBI to bolt onto the old manifold.
A few years ago HOLLEY discontinued their intake manifold, but you can still
realize many of the HOLLEY intake manifold benefits. What you should do is
machine out the opening in your present intake manifold. Do not open it up to
the full two inches as this will probably interfere with the existing EGR
passages. Use your judgement as to how much material can be removed. You can
use the 2" HOLLEY gasket as a guide. Scribe this diameter onto the intake
manifold. Stuff the intake hole with moist rags to help catch the aluminum
which is being removed from the intake manifold.
If
you own a 1987/88 Fiero, you will need to fabricate an adaptor plate. GM
totally changed the design of the TBI and intake manifold. You cannot use an
earlier design intake manifold as the head on the 1987/88 has also changed.
The earlier intakes will not bolt up to the newer head. All this means that a
simple adaptor plate will have to be fabricated allowing the old bolt pattern
of the HOLLEY TBI to be mounted onto the new GM designed intake manifold. Use
a 1/4" aluminum plate along with a new 1987/88 TBI intake gasket. Angled
screws must be used to maintain a low adaptor plate height. Remember, you must
still open up the TBI bore on your intake manifold. If you are lucky enough to
find one, use a HOLLEY intake manifold (except on 1987-88).
PORT
MATCHING
As
a simplistc example, an engine can be seen as an air pump. The more air the
engine pumps. the more power it develops. In order to increase air flow, any
obstructions must be removed the air flow path. The first and most obvious
obstruction in the 4 cylinder Fiero is in the exhaust system. When the muffler
and catalytic converter are replaced with high flow units, and perhaps headers
are installed (although they are not really a big advantage here), it is time
to look at the intake system. The easiest improvement is to replace the air
filter with a K&N Air Filter. The next step was previously discussed in
the topic entitled Throttle Body Enhancements.
Once this has been completed, it is time to go inside the engine. This brings us to another 2.5 Liter engine improvement which is to perform port matching. The only safe way to perform this improvement is to remove the intake manifold, exhaust manifolds, and the head from the Fiero. Otherwise, dirt and metal particles will enter the cylinders and drastically shorten the life of the engine.
This
is a process where the gasket, between the intake manifold and the head, are
used as a template for both the intake manifold and the intake ports on the
head. There is enough metal on the desired work surfaces so the port matching
can be accomplished safely. The head should be off the engine and all of the
valve train should be removed. After the work is completed, the heads should
be thoroughly rinsed and cleaned. Follow the GM or Haynes shop manual for the
removal of these components.
HEADS.
The intake ports are first painted with a blue dye. The intake to the head
gasket is then laid on the heads intake side using a manifold bolt as an
alignment device. Use an Exacto knife to scribe the intake passages of the
gasket onto the head. You will notice the port openings of the gasket are
larger than the intake port opening of the head. Now use a 3/8" flame
shaped carbide rotary file installed in a die grinder (capable of 20,000+ RPM
speeds) to expand the intake passages of the head. Only enter the head by
1". Going beyond this point may result in head, valve, or valve guide
damage unless you have previous experience in the porting and polishing
process. Use your fingers as a guide to determine how the work is progressing.
The newly improved openings should have a smooth transition into the head.
The
exhaust side of the heads can use the same improvement. The exhaust side will
require substantially less work because the ports are closer in size to the
exhaust manifold gasket ports. Use the technique above to port match the
exhaust ports.
INTAKE
MANIFOLD.
The same gaskets used to improve the intake ports on the head are now used to
open up the intake manifold to head ports. This is the most restrictive area
in the intake tract. Make sure the holes are open and clean. Use brake cleaner
and Gum Out to clean the passages.
Later,
when installing the intake manifold, use FELPRO BLUE as a gasket sealant on
both sides of the gaskets and follow the shop manual torque sequence for
tightening the intake to head bolts.
The
intake manifold was factory painted with a silver paint on most 4 cylinder
Fieros.
EXHAUST
MANIFOLDS.
The exhaust manifold is made of tubular stainless steel. The manifold is
basically a four into one header. Believe it or not, this manifold is
relatively free flowing. Concentrate your efforts in the area where the
"header" connects to the rest of the exhaust. Do not remove more
than the obstructions, as the manifolds are relatively thin walled. Also, do
not trim or port match the mounting flange of the ports themselves, as this is
where the welds are, which hold the mounting flanges onto the stainless steel
pipe. You will end up cutting through the welds which hold the stainless steel
tubing to the mounting flanges. Clean out all of the metal particles,
otherwise they will end up either in your engine or in the catalytic
converter.
The
exhaust manifold was not factory painted.
OCTANE
TUNING
One
of the gasolines octane rating characteristics is its resistance to
pre-ignition. The higher the octane, the higher the resistance to
pre-ignition. As an example, 93 octane gasoline is more resistant to
pre-ignition than 87 octane gasoline.
To
a limit and as a basic rule of thumb, the more your engine timing is advanced,
the more power it will make. The two draw backs to this theory are that more
advanced ignition timing settings will tend to promote pre-ignition and also
increase exhaust emissions.
The
secret here is to use high octane gasoline at all times. Once you have purged
the lower octane gas from your tank, by constantly diluting it with higher
octane gasoline, you can reset the timing of your Fiero. This trick is limited
to 1984 through 1986 2.5 Liter motors as the timing is totally ECM controlled
on the 1987/88 4 cylinder Fieros. You should follow the Fiero shop manual for
the details of this procedure, however the following are abbreviated steps on
how to perform this task. This is done with a timing light and 13 mm socket.
Run the engine warm and then loosen the distributor. Move the distributor to
increase initial base timing. The normal base timing is 8 degrees BTDC. Now
advance the timing to 10 or 11 degrees BTDC and tighten up the distributor. By
doing this you are resetting the initial timing of the engine. The ECM cannot
determine the base timing and assumes you have set the initial timing to 8
degrees BTDC The ECM now adds its own calculated advance curve to this new
base timing. This means the 10 or 11 degree advance you have set will remain
in place throughout the entire RPM range.
Now
you have must test the new timing settings. In 95% of the cases the new timing
will not be a problem. For the other 5%, the problem is with the motor. High
carbon deposits and poor quality gasolines are just two examples. With the
side windows open, accelerate and listen for a rattling or knocking noise.
Hopefully you will not hear either sound, meaning everything is alright.
However, if you hear these sounds, back off the timing by 1 degree and repeat
the test. Repeat this step until no strange noises are heard.
The
advantages you will experience by completing this task are more power and
better fuel economy. The down side are increased exhaust emissions. This is
the reason why GM limited the Fieros 2.5 Liter timing to B degrees BTDC. It is
for this reason you should advance the timing only if your Fiero is to be used
in off road applications.
DECARBONIZING
Carbon
deposits have always been a fact of life with the internal combustion engine.
Unfortunately, the introduction of fuel injected engines during the mid 1960's
had introduced a new set of problems. The problems included new areas of
carbon deposits. Carbon deposits accumulate everywhere in your engine. The
only way to slow down this process is to use premium name brand gasoline.
According to a spokesman from MOBIL, a detergent with anti-carbon properties
is placed in all grades of gasoline sold by MOBIL. The only difference is the
concentration of this detergent varies with the grade of gasoline. The premium
grades contain the highest levels of the detergent additive.
Carbon
deposits form in quantity in two areas of the 2.5 Liter Fiero engine, the
intake tract and around the intake valves.
The
intake tract can be completely clean only through disassembly and the use of a
wire brush. Aside from doing this you can clean another area, which
immediately affects performance, and is accessible with the engine fully
assembled and also still being in the Fiero. The others are in the throttle
body. Excessive carbon can prevent the throttle plates from closing completely
or even blocking some of the vacuum passages. The throttle plate can become
stuck (open or closed) and even end up setting some ECM codes. The air cleaner
side is always nice and clean. As soon as you pull on the throttle cable to
open the throttle plate everything is black. It is this black carbon which you
must clean. This is accomplished with a brass tooth brush and several cans of
Gum Out Carburetor Cleaner. First place a small clean damp rag just past the
throttle plates. This will prevent debris and excessive amounts of Gum Out
from entering the engine. Soak the blackened area with Gum Out and then use
the brass brush to loosen it. Remove the debris with a clean rag. Spend extra
time cleaning behind the throttle plate, the throttle plate pivots, and the
throttle body bore area where the throttle plate touches.
Carbon
around the intake valves is a much more severe and difficult problem to
correct. The problem arises when the cool gasoline leaves the fuel injector
and hits the heated valve causing some microscopic deposits to be left behind.
This problem is further compounded when the intake valve guide seals (two per
intake valve, an Umbrella type and the standard "0" Ring type)
deteriorates which allows oil to build up on the valves, which can amount to
an incredible build up. This can actually block most of the air flow into the
cylinders. This results in a choked engine which refuses to perform. Some
companies sell products which claim to remove this carbon build up, but I have
not experienced ant to perform as claimed. The only efficient way to remove
this intake valve carbon build up is to remove the intake valves from the
heads and either replace them, or clean them with a sharp chisel and a wire
wheel. This procedure requires removing the heads from the Fiero.
VALVE
GUIDE SEALING
Virtually
all engines contain valve guide seals. The purpose of the seals are to prevent
oil from entering the valve bowl area and either getting burned (intake) or
leaving as a cloud of smoke (exhaust). Heat and time take their toll on the
seals. The result is carbon depositing on the intake valves developing quicker
(see above), resulting in the Fiero smoking after sitting still for sometime.
The
valve guide seals can be replaced without removing the heads from the engine.
As a quick overview the following must be performed. Follow the shop manual
for detailed procedures on each of the following over viewed steps:
(1)
Remove the valve covers
(2)
Remove all four spark
plugs
(3)
Remove all eight rocker
arms
(4)
Install a compressed
air adaptor into the spark plug hole and apply compressed air. This will hold
up both intake and exhaust valves for the cylinder being worked on.
(5)
Using one of the rocker
arm retaining nuts, and a lever type on-car spring compressor, depress the top
of the valve retainer, With needle nose pliers remove the two valve stem keys
(keepers). Release pressure on the valve spring, then remove the retainer and
valve spring. The compressed air will hold up the valve, Remove the old
"0" Ring seal (both the intake and exhaust valve have this seal),
and wiper seal if you are working on the intake valve, Install the new seal(s)
and reverse the process to replace the valve keys.
(6)
Repeat steps (4) and
(5) above for the other 7 valves.
(7)
Re-assemble the
remaining components of the motor per the shop manual.
INCREASING
THE EFFECTIVE REDLINE
The
redline, or maximum operating RPM of the 2.5 Liter engine is 5000 RPM. Most
stock four cylinder engines have a hard time finding the high side of 4000
RPM. Many engine parts can limit the maximum RPM of an engine.
A
large step can be realized in achieving that 5000 RPM redline in the 1984
through 1986 Fieros. This is done by replacing the ignition coil. GM makes
some nice ignition parts, but fell short with the coil. The answer: Bolt on an
ACCEL, or other brand of high performance coil onto the rear trunk sheet
metal, near the original stock coil location. With a coil change, a free
flowing catalytic convertor, and a new TBI alone, you will really wake up the
little motor.
HARMONIC
BALANCER USAGE
A
harmonic balancer absorbs the torsion vibrations which occur within the crank
shaft. These vibrations are caused as each cylinder fires and part of that
"power pulse" is sent to the crank shaft, in a direction which does
not contribute to the power being output to the flywheel. Having a harmonic
balancer does not eliminate the pulses, but it does give them a place to go.
This will contribute to longer crank shaft and timing gear life. GM introduced
a harmonic balancer for the 1987/88 Fiero 2.5 Liter motor. The part number is
10101369. Unfortunately, GM did not think about the earlier Fieros models.
BUILDING
UP THE FIERO 2.5 LITER MOTOR
GM
developed a nice 2.5 Liter engine program. This program is called the Super
Duty Four Cylinder. Once this motor is built up correctly, it will give a 1996
Corvette a run for its money. The bad news is that just about every piece of
this motor is race ready, and very expensive. A completely assembled motor
will run about $7000.00. As you can see, this is a little on the high side. Do
not give up hope or even your stock four cylinder. if you follow all of the
previous suggestions, your stock 2.5 Liter will be good for about 110 to 115
HP. Considering the stock motor puts out about 94 HP this is not too bad. If
you want more, then a complete rebuild is necessary. Standard Blueprinting
practices are recommended, along with the following parts:
(1)
Pistons - TRW piston
part number 248SF-SO, TRW ring part number is T8370-30. This is a forged 0.030
oversized piston. I do not recommend an over bore larger then this as the
block is not to strong or thick in the cylinder area. Make sure a deck plate
is used when boring and honing the cylinders. The compression ration will
increase to about 9.1:1 where stock is approximately 8.4:1. I strongly
recommend the use of the previously described improvements if you decide on
these pistons. These pistons will fit in the 1984 through 1988 motors.
(2)
CAM Shaft - TRW TP-209,
Intake Lift = 0.409", Exhaust lift = 0.516, Duration lIE = 204~/2 140.
This is a nice improvement over stock and which will not require head work for
the spring perches. The stock ECM will also work with this cam shaft. I
strongly recommend the use of the previously described improvements if you
decide on this cam shaft. This cam is a direct bolt in for the 1984/85 motor.
You can use it in the 1986 to 1988 motors if you use conventional lifters in
place of the roller lifters. You will also have to use the 1984/85 push rods
in the later motors if you use this cam shaft.
(3)
Timing Gears - Cloyes
makes a nice all steel set. GM has improved their own timing gears which can
be ordered under part number 10101790. This gear set will fit the 1984 through
1988 motors.
(4) Valve Springs - TRW part number VS1 100, using retainers SR363. These parts can be used only in the 1984/85 motor. Use the stock springs with the 1986/88 motor.
(5)
Oil Pump - TRW High
Volume part number 50132. This oil pump can only be used only in the 1984 to
1986 motors. The 1987/88 motors use a gyrator type pump which is part of the
balancer assembly.
(6)
Use brand new GM Head,
Connecting Rod, and Main Bearing Cap Bolts. Follow the latest Torque-to-Yield
Bolt specifications.
(7)
Replace the catalytic
convertor with a high flow ACCEL unit.
(8)
If the oxygen sensor is
2 years old or older, it should be replaced. The accuracy decreases the range
of forcing the engine to run lean.
Balance
the reciprocating crank shaft mass to within + 0.5 gram. This includes the
crank shaft, pistons, rods, rings, bearings, front hub, and flywheel. This
will remove much of the engine vibration characteristics and provide a slight
increase in power.
Increase
the fuel pressure on the HOLLEY TBI unit (it is adjustable) to 15 pounds.
After
the stock or aftermarket header, replace the stock exhaust with a 2 1/4"
stainless steel unit such as the one sold by the Fiero Store. This removes the
stock restrictive muffler and replaces it with resonator tips. The sound is a
little louder, but it does sound nice.
This
is about as good as you can expect with the stock block, crank, and head. You
can expect the engine to produce 120 to 130 HP if all of these modifications
are made.
by
S.
J. Wynman
|